Showing posts with label WildHeart Art. Show all posts

Thursday, February 9, 2017

Win a Spot in my New On-Line Workshop~"LifeStory" Art Journal Creations!


Win A Spot in MY New On Line Workshop
 creating "LifeStory" Art Journals!


There is nothing more special than creating in a beautiful journal that you yourself have created with love!


 In this fun creative workshop we will create special polymer clay tiles that express what is important and meaningful for you.  By adding metal embellishments, charms, jewels, inspirational messages and sari silk ribbons you can create these amazing and  beautiful art or writing journals!


To win a spot in this wonderful workshop just post a comment below on what would be the most meaningful quote that you would create and add to your own "LifeStory" Journal? Share the post and tag me so I know that you have shared the link and Good Luck! Winner will be chosen on Valentines Day!!
Those who have already purchased the workshop will also be eligible!
For more information on the workshop visit here.
 Early Bird Special price until 2-14!
Hope to see you in class!

Friday, January 6, 2017

In Studio Retreat ~Bohemian Ring Bling Bliss~ 2 Day Workshop with Nancy Powell-Sacco~ July 15th & 16th 2017

Bohemian Ring Bling Bliss”
July 15th & 16th 2017

Sterling Silver Boho Ring Making Workshop
with
Nancy Powell Sacco

 Feel the Boho vibe as you learn how to create these 2-beautiful unique sterling silver rings with my special guest workshop instructor Nancy Powell Sacco here at my Upstate NY art studio! We will have such a great time learning about working with silver , understanding  some important techniques  and creating some fun freestyle unique Boho rings!


~Workshop Descriptions~

~Bohemian Bling~


Imagine creating this gorgeous silver and gemstone ring to wear! Your creation and design  made to fit your finger perfectly and  by selecting a stone that you will love, this ring is guaranteed to  capture the attention of all who see it!
In this class you will learn how to cut out a backplate to complement the stone of your choice, then hammer or stamp a design on it as you like.  You will learn how to set a stone cabochon of any size or shape in a silver bezel and be shown how to greatly reduce any chance of melting your bezel during the soldering process.  You will be taught how to solder sterling silver using silver solder and a small butane torch, known in cooking circles as a crème brulee torch. You will file and polish your piece so that all of the components look flawlessly joined.  When your ring band and setting have been soldered and tumble polished, you will set your stone securely using special tools that will be provided to you during the class
Materials included in kit - $50
Sterling silver sheet metal
Sterling silver for the ring band
Fine or sterling silver bezel wire
Selection of stone cabochons

Sterling Silver Spinner Ring


Learn how to work with sterling silver sheet metal in your choice of sterling, bronze, copper or brass wire, or patterned sterling silver or gold filled wire for the spinners. Complete written instructions are included.  Your personal selection of spinner types and band texture will assure that your ring will be one of a kind and completely unique to your taste.  Leave with a beautiful sterling silver spinner ring for yourself or to give as a special gift.
You will learn how to form and torch solder (using a small butane torch known in cooking circles as a crème brulee torch) sterling silver sheet metal into a ring that will be custom sized to your finger, how to make the spinners, and learn the secret of how to keep the spinners from falling off the ring band!  After your piece is complete, you will tumble your beautiful custom ring to a glorious shine!  Customize your ring by choosing to make a straight or wavy edge on your band, leave it smoothly pristine, hammer it for a cool faceted look, or choose to decorate it using metal stamps of your choice.  Then select the metal or metals you want for your spinners.  So many choices—so little time!
Materials List – Kit Fee $25( includes)
Sterling silver sheet
Sterling or Gold Filled Patterned wire
Sterling, Copper, Bronze, and/or Brass wire

 ~Please note~
*These Workshops can also be taken individually as a 1 day workshop! Check out website below for details
 *All skill levels welcome!  Must be at least 17 years old.
*Please do not wear loose or flowing clothing in the class, and tie long hair back as we will be using torches and wish to observe good fire safety procedures.
*Supply Fee in descriptions above, payable to instructor ~Nothing to bring!
*Space is limited so please register early !!

***Weekend Boho  Ring Retreat ~$450.00***
(Early Bird Registration cost~$425.00 by Feb 14th)

Saturday workshop is 9am-4pm ( cookout dinner and “s’mores bar” after workshop)
 Sunday workshop~ 9am-4pm .
Gourmet lunch, snacks, drinks provided both days
WildHeart Art Studio
981 County Rd 23 ,Phelps NY 14532
585-905-9388


Nancy Sacco 
Nancy’s Fancies Jewelry

Originally from Maryland, Nancy has lived most of her life in Pennsylvania, where she currently resides in Shrewsbury with her husband (and biggest fan), two rescue dogs, and two cats.  She is retired from McCormick & Company (the spice company) and started work in earnest on her real passion of creating jewelry.  Her workshop is in her home, where she also enjoys teaching her craft.

Making jewelry has been a passion of Nancy’s for years, and over time she discovered she especially loved working with sterling and fine silver and beautiful gemstones.

She teaches her craft at art conferences throughout the United States as well as in local art studios.

Nancy is a member of the Central Pennsylvania Bead and Jewelry Society, the Pennsylvania Guild of Craftsmen, the York Town Craft Guild, and a juried member of the Yellow Breeches Craft Guild.


Thursday, February 18, 2016

Art Of A Gypsy Summer Solstice Retreat~ Amazing Give Away!!!


"Art Of A Gypsy"

 Summer Solstice Retreat

 AMAZING GIVE AWAY!

3 Day Artist Paradise
June 16th-18th 

Come and  join us  as we celebrate the summer solstice and being wildly creative! Our days will be filled with art, storytelling,activities,friendship and so much more!
And because I believe in also celebrating friendships...
 For the next 3 people that sign up with a friend by  February 23.. the friend gets her space for 1/2 price!!! YES you heard me right:) Or you both can share the expense and celebrate each other! How ever you choose to do as a gift for your friend or to split it.. You will have  a beautiful experience here that you will cherish for years to come.
After you sign up message me and I will offer the 2nd person half price!
Register
**Also available is a 3 payment plan
Hurry though ONLY 3  SPACES at the half price offering! Comment below and share on your FB page/twitter/instagram etc for an extra something special to win from me~ 1 winner will recieve some artsy goodies I have created just for your journal
( winner to be posted Feb 23rd)
For more detailed info on this wonderful experience visit

I look forward to having you join us!!

Tuesday, February 2, 2016

~ Hello Valentine~New Proxxon DT Project by Sherri Welser

~Hello Valentine~


Looking for something unique for your next Valentine Project? This wonderful Vintage style Valentine is created on wood and  is the perfect project for ease and creativity! For details on how to create your own Hello Valentine visit Proxxon Tools DT Blog where you will find this and other wonderful projects to create!


Have a beautiful Day and Enjoy!
In Love & Light
Sherri

Tuesday, January 19, 2016

~Family Treasures~ Proxxon DT Project by WildHeart Art


~Family Treasures~

I am always looking for unique ways to do "the ordinary" so when I came across this wonderful family photo I wanted to find a fun  and unique way to display it. This is actually a picture of my Grandpa and Grandma with their children, my aunt and mom are on the end. I love the way I was able to capture the vintage feel of this project.
Visit Proxxon's Blog  for all the creative details!!

Tuesday, November 24, 2015

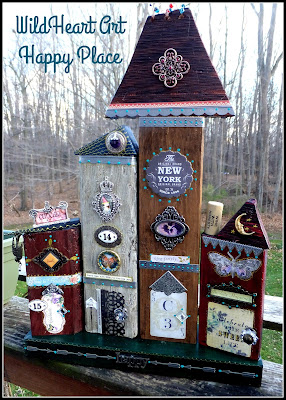
"Find Your Happy Place" Vintage Wooden Houses~ Proxxon Design Team Project


"Find Your Happy Place"

Creating with PROXXON Tools


I Love to work with wood and making little Vintage houses is so much fun! For this project I used the PROXXON Scroll saw and Delta Sander to create these lovely little houses. The supplies I used are listed below

Supplies
 5 Random sizes of 2 x4 
(the sizes I used were from 6" to 12" tall- 4 houses and the base)
Crackle Paint ( I used Tim Holtz Distressed Crackle Paint)
Antique Glaze
Glue Gun
Glossy Accents
Assorted pieces of metal and paper ephemera,trinkets, charms and small doorknobs, anything that you feel would be a fun addition to your houses!
Acrylic paint
Gold Gel Pen
4 large Screws
Cooper wire for beading on the roof

1) I began with finding some random sizes of lumber.. 2x4s and some small scraps of thinner wood for the roofs. I cut the 2x4s
 ( with the scroll saw) into misc heights and sanded ( using the Delta sander)  the rough edges.. but still left some rough patches  to to give the appearance of weathered wood. I then cut the smaller pieces of wood into several triangular pieces for the roofs.


2)I wanted the look of old worn wood so I then painted the 2 x 4s that would be the houses with the crackle paint.


3)Here you can see the pieces all painted with an antiquing medium finish.
4)I set all the pieces in front of me with all the fun items to get an idea of how I wanted to design the houses.I used the glue gun to adhere most of the items to the houses.

5)I used the glossy accents to fill in some of the metal trinkets after adding vintage papers. I also used the gold gel pen to add doodles.
6)The final step is to screw the 4 houses to the bottom base piece.
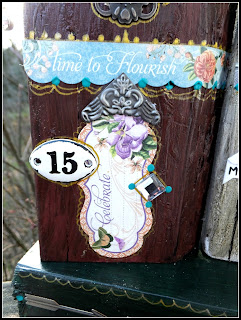
 I had so much fun decorating these sweet little houses with all sorts of metal trinkets,paper ephemera and inspirational words!
 Here you can see why it is called "Find Your Happy Place"


 Here I thought it would be fun to use a funky wine cork for the chimney!


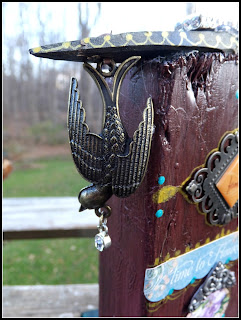
 I love this little bird in flight and adding that fun whimsy!


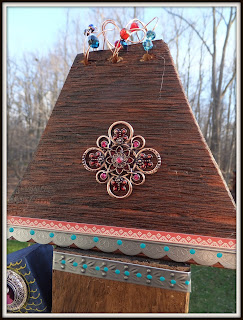
 Here I added some copper wire and beads on top to add an interesting element and bring your eye                                                                               upwards.


PROXXON makes creating these interesting and fun creations so much easier with their wonderful tools! 
Happy Creating!
Sherri

Tuesday, November 10, 2015

Proxxon Design Team~Free Spirit~ Gypsy Style Buffet


~Free Spirit~
Gypsy Style Buffet

I just love Bohemian and Gypsy inspired pieces as I am a total "free spirit" and just the uniqueness that the Gypsy style brings! I am so happy to be a new Design Team member for Proxxon tools as I love creating all types of projects with wood . I was in the middle of redoing this vintage style buffet  when my order arrived from Proxxon. I chose to use the Delta sander to be able to quickly sand down the areas to give it a worn look.


 I just love the Delta sander and was surprised that it was so well made and felt so comfortable in my hand. I used it to sand down the piece around all the edges (using a medium grit sand paper) and the top of the buffet and the drawers. It took no time at all and it was wonderful to sand these areas with such ease! The paint base is chalk paint ( Folk Art)  in the color "Savannah" . It was a blue color previously and I thought it would be fun to have some of that peek through to add more of a "story" to the piece.


 I used a large wall stencil to decorate the top and sides as well as the drawer fronts. I used a plum color acrylic paint.


 I  then decided to add gold acrylic dots to adorn the pattern

The goal for this piece was to have an antique finish on it and I used an antique wax medium. It made the piece a bit darker but I love the fact it looks like it is an old well loved piece!


Being able to use the Delta sander for part of this project made that tedious part of the task so much easier and faster! I love the way you can easily attach the sandpaper triangles with the velcro base! I was pleasantly surprised at how well the velcro sandpaper triangle held on!! It didn't budge at all while sanding!
 I Hope you all have some fun creating a little Vintage Gypsy piece for yourself!
 Purchase PROXXON products  here 

Monday, May 5, 2014

"With This Ring.. I Thee Wed"~ Design Team Post featuring SinCity Stamps and Ecstasy Crafts


"With This Ring I Thee Wed"

By WildHeart Art featuring SinCity Stamps and Ecstasy Crafts


I love creating these fun little wedding cake journal pages and what better time to do this project than in May! I love to work with all kind of fun textures and this project lends itself well to that type of artwork! You ca also use up alot of little "do dads" for the decorating as it doesn't take much in the way of supplies to decorate them! I  also happen to be using some beautiful items from SinCity Stamps and Ecstasy Crafts.

~Supplies~
Journal page
Assorted markers for shading
Ranger Liquid Pearls
Tim Holtz Stickles
Acrylic paint in corresponding color for background
Gel medium-matte
 Vintage style tissue paper for the background
Selection of corresponding collage papers cut into rectangles to represent each layer
Velum quote


 1) Start by gathering your  pre- cut rectangle  collage papers and tissue paper.
2) Using you Matt Gel medium glue down the tissue paper for the background onto the journal page. I also dabbed some acrylic paint here and there for interest and color.
3) Glue down the rectangle papers of different lengths to represent a wedding cake with size different tiers.


4) You then will start the detail work positioning the lace stickers as shown above and adding the self adhesive pearl dots. Feel free to also outline the tiers in maker to give the cake depth.

5) This collage paper already had a butterfly on it about the same size, so I am just gluing it down over the existing pattern.

Here you can see the detail up close.


 6) I wanted to give the illusion of a stained glass butterfly so I applied  Tim Holtz Stickles glitter glue inside the butterfly wings for a bit of color and shimmer to the wings.


7) I then detailed the lace and the cake with "Liquid Pearls" by Ranger


I just love how it all comes together with all the beautiful detailing!


8) The last thing I did was to add the velum quote at the very top of the wedding cake!
I hope you all have had a wonderful time  creating this beautiful tired wedding cake!

*For those of you who love Stampington  & Company Publications ~ Check out their Summer issue of Somerset Studio Gallery Magazine which hits the newsstands June 1st~
 I am featured in the Artist Spotlight with my Vintage Beach House Mixed media Canvas! YAY!

In Love & Faith
Sherri